Difference between revisions of "Objects recognition and position calculation (webcam)"
(→Utilization of a new OpenCV version in ROS Electric) |
(→Installation of OpenCV) |
||
| Line 28: | Line 28: | ||
</syntaxhighlight> | </syntaxhighlight> | ||
| − | When the update/upgrade | + | When finish the update/upgrade, we will place us in the [http://opencv.org/ OpenCV] folder in a terminal and execute the next commands in the terminal in order to compile: |
| − | |||
| − | |||
| − | |||
| − | |||
| − | |||
| − | |||
| − | |||
| − | |||
| − | |||
| − | |||
| − | |||
<syntaxhighlight enclose="div"> | <syntaxhighlight enclose="div"> | ||
| Line 49: | Line 38: | ||
</syntaxhighlight> | </syntaxhighlight> | ||
| − | + | We will execute the next command in the terminal in order to configure [http://opencv.org/ OpenCV]: | |
<syntaxhighlight>sudo gedit /etc/ld.so.conf.d/opencv.conf</syntaxhighlight> | <syntaxhighlight>sudo gedit /etc/ld.so.conf.d/opencv.conf</syntaxhighlight> | ||
| − | + | We add the next code line to the opened file and save the changes: | |
<syntaxhighlight>/usr/local/lib</syntaxhighlight> | <syntaxhighlight>/usr/local/lib</syntaxhighlight> | ||
| − | + | Now, we will execute the next commands in a terminal: | |
<syntaxhighlight> | <syntaxhighlight> | ||
| Line 64: | Line 53: | ||
</syntaxhighlight> | </syntaxhighlight> | ||
| − | + | We add the next code lines at the end of the opened file and save the changes: | |
<syntaxhighlight> | <syntaxhighlight> | ||
| Line 71: | Line 60: | ||
</syntaxhighlight> | </syntaxhighlight> | ||
| − | + | We will restart the PC to finish the installation. | |
| + | |||
| + | ====Modification of the package cv_bridge==== | ||
| + | |||
| + | <!-- | ||
| + | |||
====Modificación de cv_bridge==== | ====Modificación de cv_bridge==== | ||
Revision as of 17:21, 30 December 2013
Contents
Objects recognition
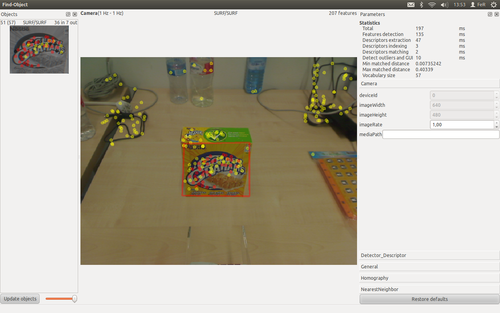
We have used the package find_object_2d which has been develop by Mathieu Labbé (Université de Sherbrooke). The program can recognizes objects in the scene using an image of the object. The program has a graphical user interface which allow to capture an image of the scene and save it.

In the screenshot that is shown above, we can see how the recognized object is within a boundary box which coincide with the corners of the object image.
The program provides several data of each found object in the scene. We will use the next data:
- Width of the object image (number of pixels).
- Height of the object image (number of pixels).
- Position of the corners of the object image in the scene.
Utilization of a new OpenCV version in ROS Electric
The previous package needs in order to compile the OpenCV version 2.4.3 or higher, but ROS Electric has the OpenCV version 2.3.1. We will install the OpenCV version 2.4.3, modify the package cv_bridge and modify the package find_object_2d.
Installation of OpenCV
First we will download the OpenCV version 2.4.3 by the official web. We will extract the content of the downloaded file in the personal folder. We will execute the next commands in a terminal in order to update the ubuntu packages:
sudo apt-get update
sudo apt-get upgrade
When finish the update/upgrade, we will place us in the OpenCV folder in a terminal and execute the next commands in the terminal in order to compile:
mkdir build
cd build
cmake -D WITH_TBB=ON -D BUILD_NEW_PYTHON_SUPPORT=ON -D WITH_V4L=ON -D INSTALL_C_EXAMPLES=ON -D INSTALL_PYTHON_EXAMPLES=ON -D BUILD_EXAMPLES=ON -D WITH_QT=ON -D WITH_OPENGL=ON ..
make
sudo make install
We will execute the next command in the terminal in order to configure OpenCV:
sudo gedit /etc/ld.so.conf.d/opencv.confWe add the next code line to the opened file and save the changes:
/usr/local/libNow, we will execute the next commands in a terminal:
sudo ldconfig
sudo gedit /etc/bash.bashrc
We add the next code lines at the end of the opened file and save the changes:
PKG_CONFIG_PATH=$PKG_CONFIG_PATH:/usr/local/lib/pkgconfig
export PKG_CONFIG_PATH
We will restart the PC to finish the installation.